Quantcast
Channel: JinJin 的視覺設計專區 - 網頁設計與語法(HTML/CSS)
Viewing all articles
Browse latest Browse all 70

[講義07] 以Float:浮動,製作雙欄網頁 (雙欄Float:浮動、Table:表格、錨點、垂直導覽列) (no replies)

$
0
0
  1. 1. Adobe Dreamweaver CS5 & CS5.5使用手冊
  2. 2. 以視覺化方式建立 Spry 頁面
  3. 3. 使用選單列 Widget
  4. 3.1 關於選單列 Widget
  5. 3.2 插入和編輯選單列 Widget
  6. 3.3 自訂選單列 Widget
  7. 3.3.1 變更選單項目文字樣式
  8. 3.3.2 變更選單項目背景顏色
  9. 3.3.3 變更選單項目尺寸
  10. 3.3.4 定位子選單
  11. 4. 關於標籤面板 Widget
  12. 4.1 插入和編輯標籤面板 Widget
  13. 4.1.1 插入標籤面板 Widget
  14. 4.1.2 新增面板至標籤面板 Widget
  15. 4.1.3 從標籤面板 Widget 刪除面板
  16. 4.1.4 開啟面板以進行編輯
  17. 4.1.5 變更面板順序
  18. 4.1.6 設定預設開啟的面板
  19. 4.2 自訂標籤面板 Widget
  20. 4.2.1 設計標籤面板 Widget 文字
  21. 4.2.2 變更標籤面板 Widget 的背景顏色
  22. 4.2.3 限制標籤面板寬度
  23. 5. TAB實作步驟
  24. 5.1 插入標籤面板
  25. 5.2 修改標籤標題,屬性面板對照
  26. 5.3 重新設定標籤外觀的樣式 .TabbedPanelsTab
  27. 5.4 文字居中對齊的設定
  28. 5.5 設定滑鼠移過時的標籤樣式 TabbedPanelsTabHover
  29. 5.6 設定檢視中頁次的標籤樣式 .TabbedPanelsTabSelected
  30. 5.7 設定整個標籤面板的外觀樣式.TabbedPanels
  31. 5.8 設定標籤內容區的外觀樣式 .TabbedPanelsContentGroup
  32. 5.9 設定標籤內容區的樣式重覆右邊的藍線 .TabbedPanelsContent
  33. 6. 優良網站分析
  34. 7. 範例分析
  35. 7.1 範例網站:
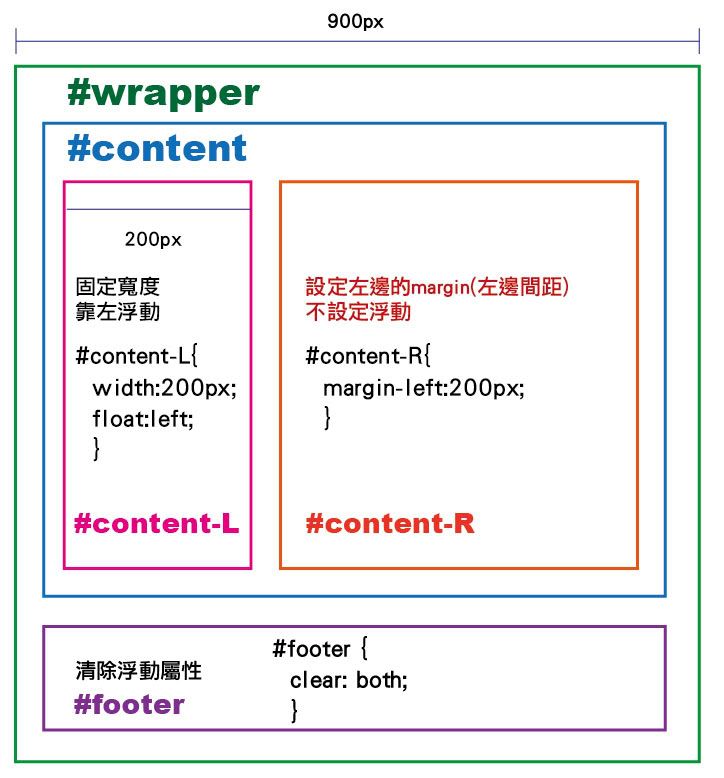
  36. 7.2 網站名稱:J-period
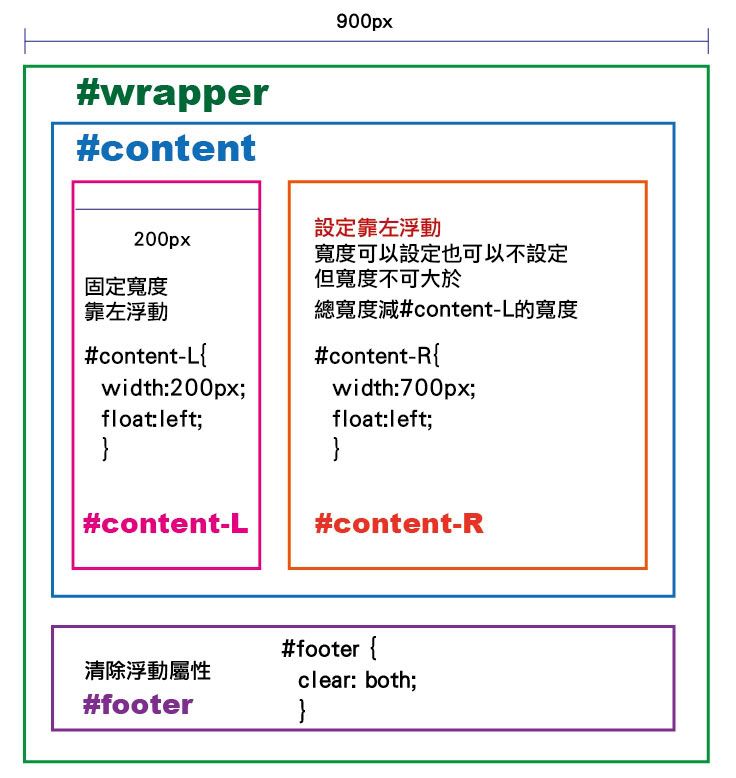
  37. 7.3 設計風格:
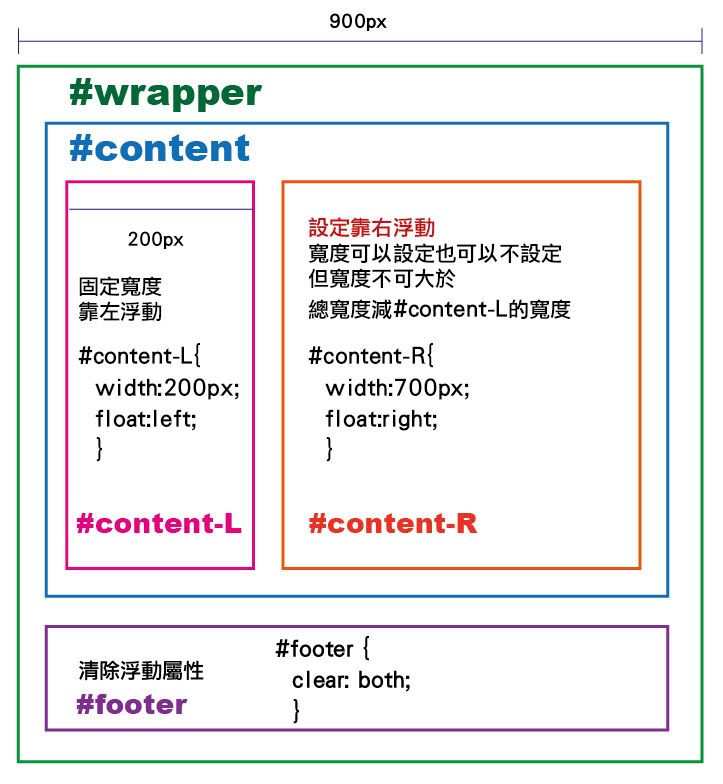
  38. 7.4 色彩分析
  39. 7.5 版面分析
  40. 7.6 跨瀏覽器問題與分析
  41. 8. 雙欄網頁概述
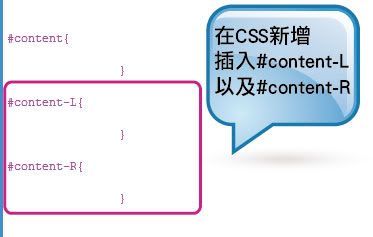
  42. 9. 雙欄網頁,float:浮動屬性做法概述
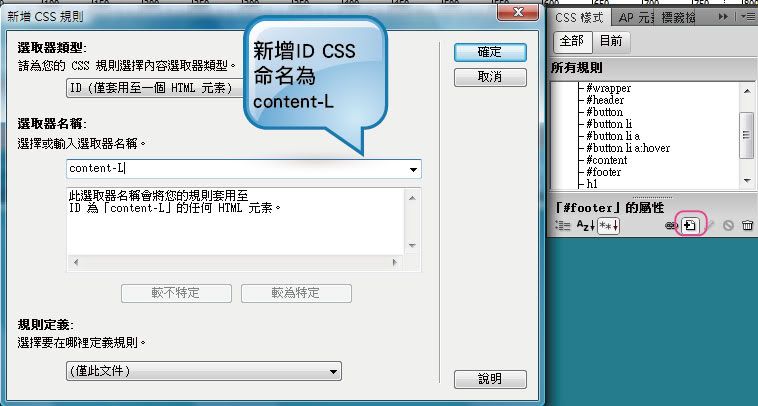
  43. 9.1 左側欄位:固定寬度,靠左浮動;右側欄位:設定左邊的margin(左邊間距),不設定浮動
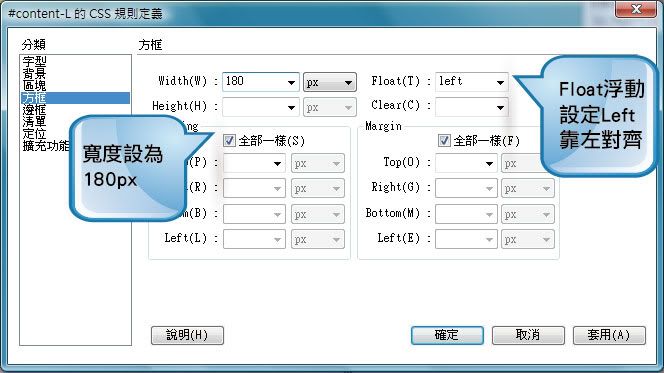
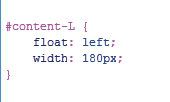
  44. 9.2 左側欄位:固定寬度,靠左浮動;右側欄位:設定靠左浮動,寬度可以設定也可以不設定,但寬度不可大於總寬度減左側欄位的寬度,建議更小一點,以免造成欄位崩壞的問題
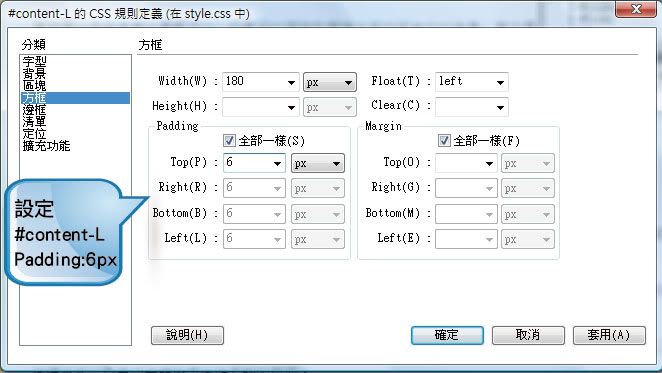
  45. 9.3 左側欄位:固定寬度,靠左浮動;右側欄位:設定靠右浮動,寬度可以設定也可以不設定,但寬度不可大於總寬度減左側欄位的寬度,建議更小一點,以免造成欄位崩壞的問題
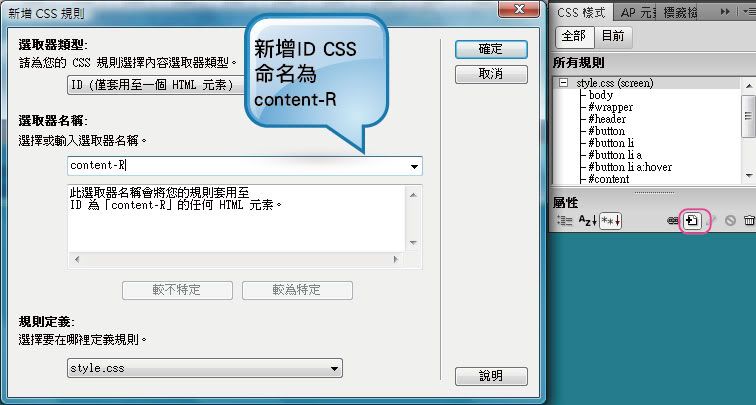
  46. 10. 本單元雙欄網頁範例,float:浮動屬性做法概述
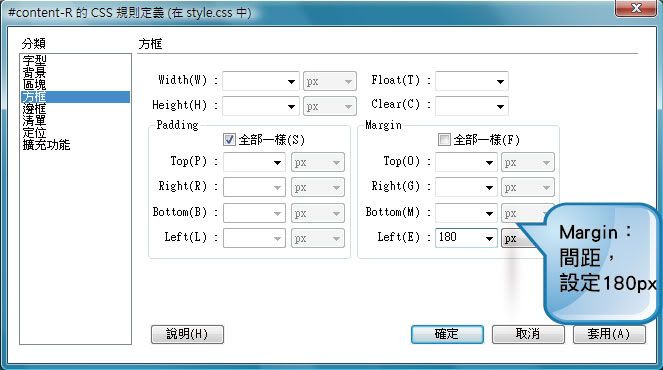
  47. 11. 雙欄網頁,float:浮動屬性做法步驟
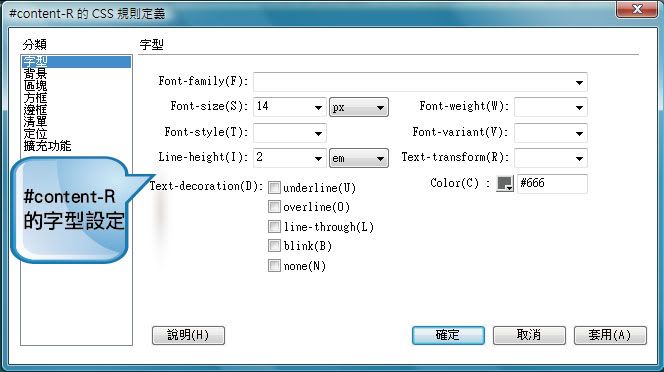
  48. 11.1 在#content內,加入兩個DIV:#content-L:靠左邊,#content-R:則在右邊
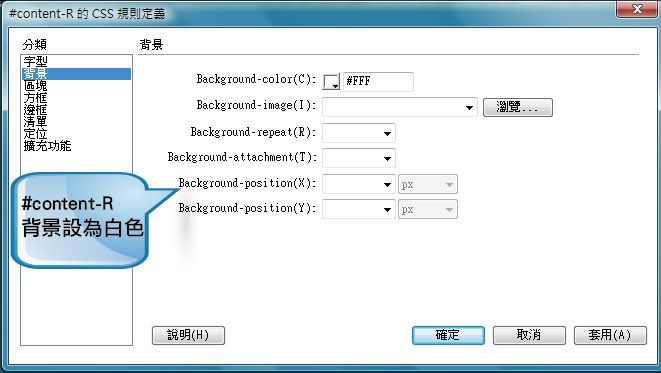
  49. 11.2 在CSS新增插入#content-L?以及#content-R (可手動加入,也可以Dreamweaver指令插入
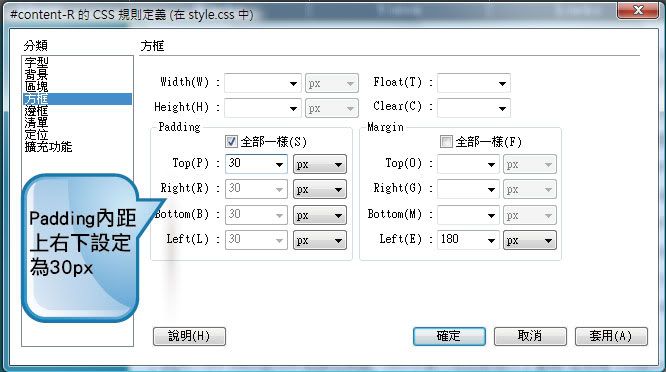
  50. 11.3 新增ID CSS,命名為content-L
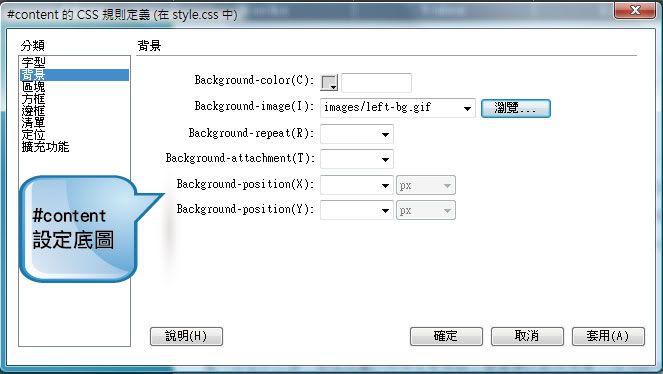
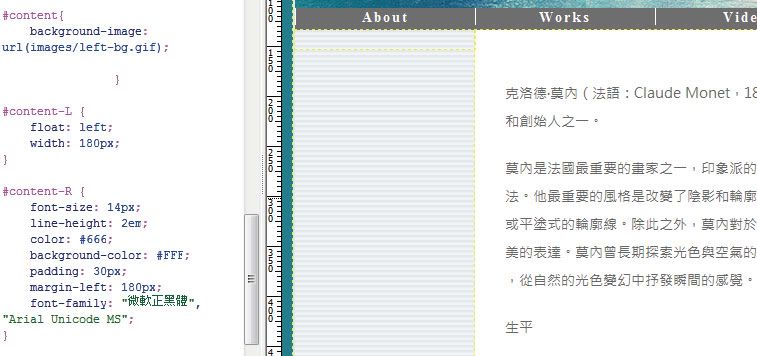
  51. 11.4 Float浮動設定Left,靠左對齊;寬度設為?180px
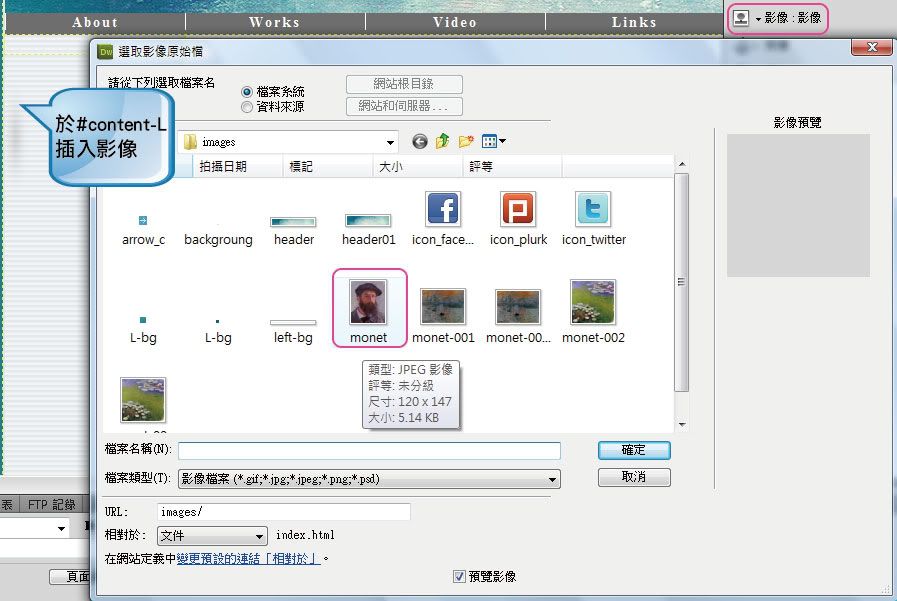
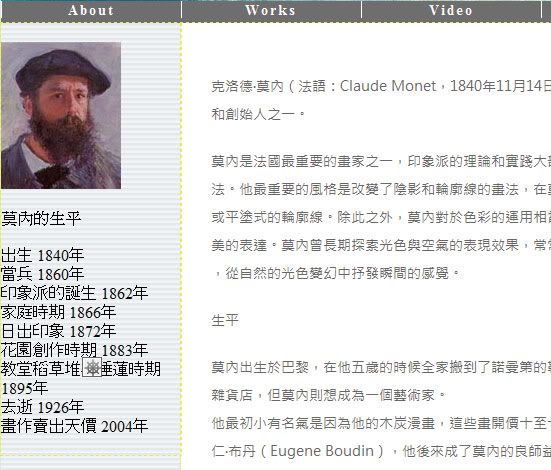
  52. 11.5 設定#content-L,Padding:6px
  53. 11.6 新增ID CSS,命名為content-R
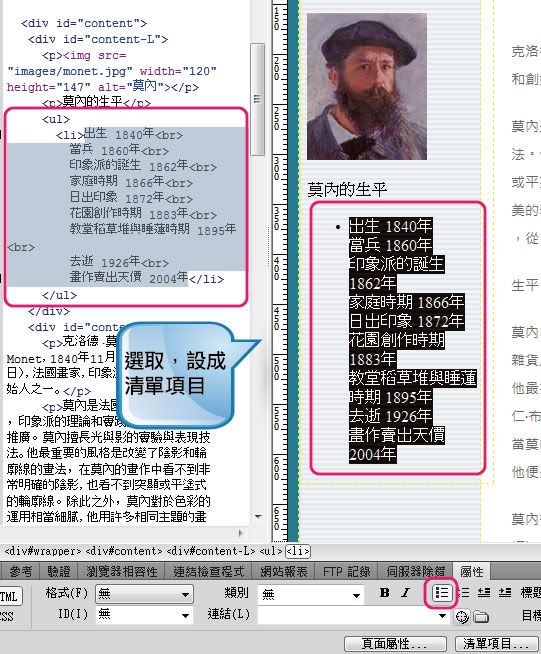
  54. 11.7 Margin:間距,設定180px (#content-L的寬度)
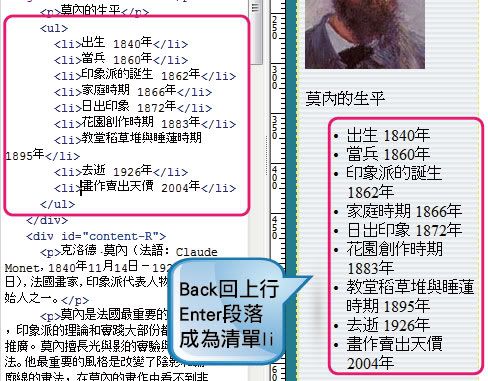
  55. 11.8 #content-R?的字型設定
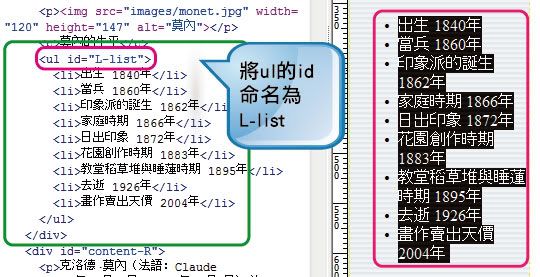
  56. 11.9 #content-R?背景設為白色
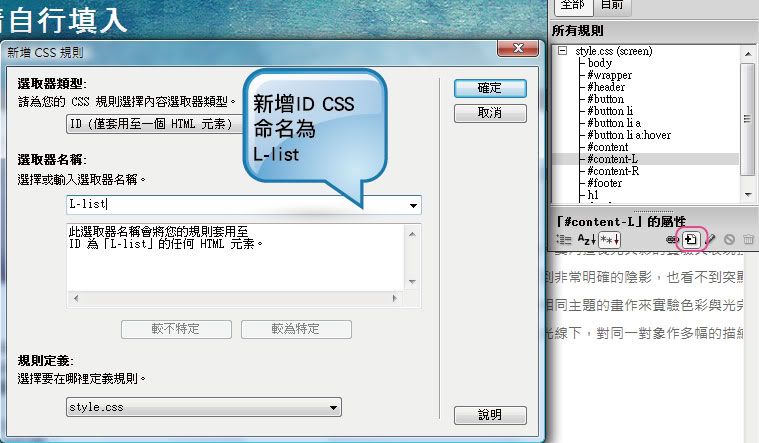
  57. 11.10 #content-R?,Padding內距?上右下設定為30px,使視覺效果更舒服
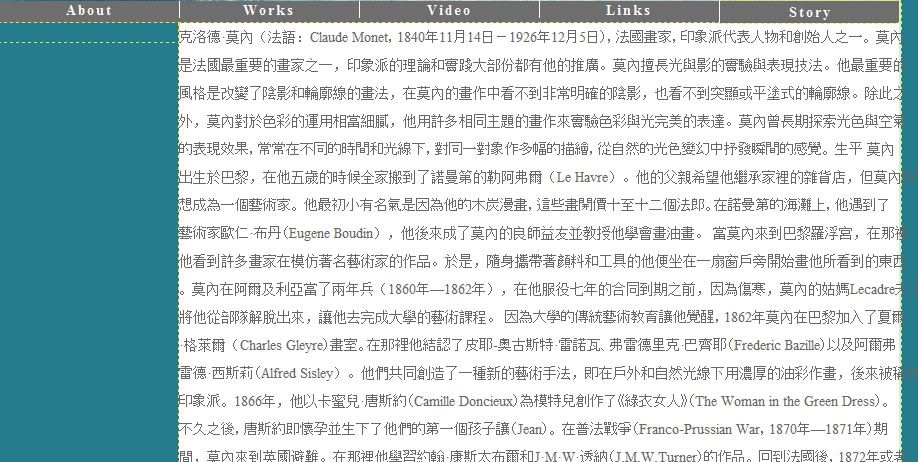
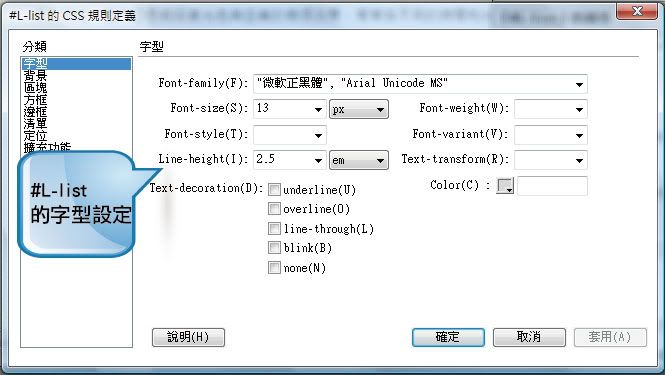
  58. 11.11 #content?設定底圖,會顯現在#content-L,(因#content-R設為白色右邊蓋住底圖)
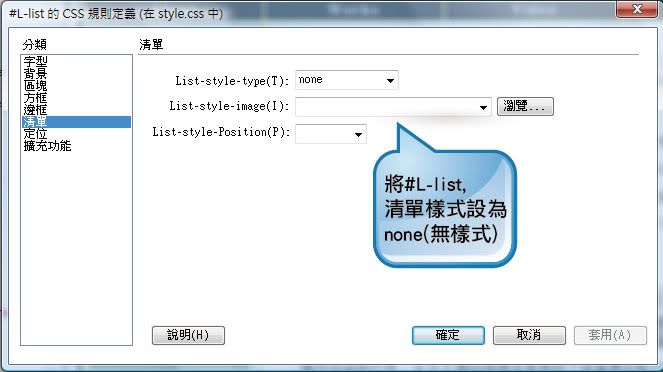
  59. 11.12 於#content-L?插入影像
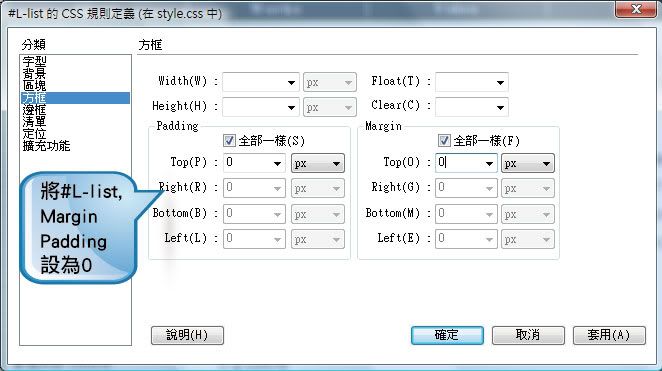
  60. 11.13 於#content-L,貼上記事本的清單列文字,做為左列的清單按鈕文字
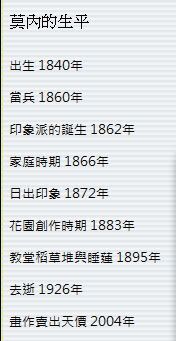
  61. 11.14 選取,設成清單項目
  62. 11.15 Back回上行?Enter段落?成為清單li
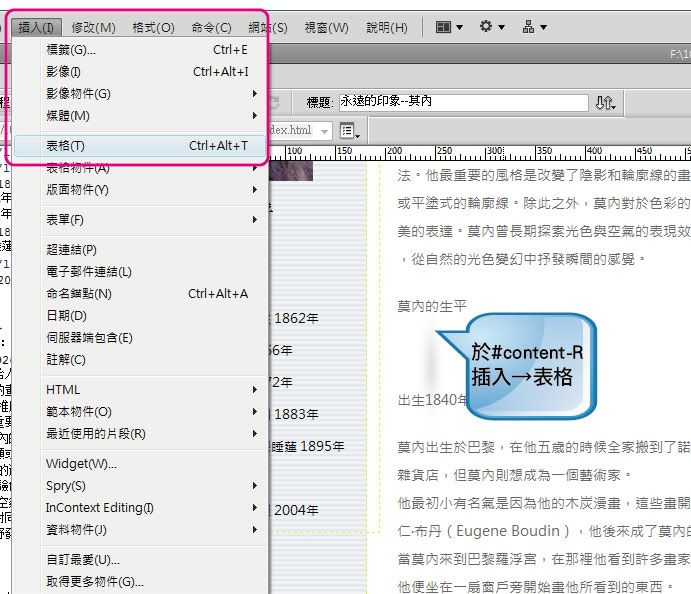
  63. 11.16 將ul的id命名為L-list (可自行命名)新增ID CSS命名為L-list
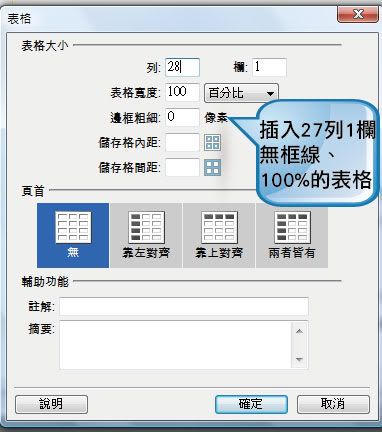
  64. 11.17 新增ID CSS命名為L-list
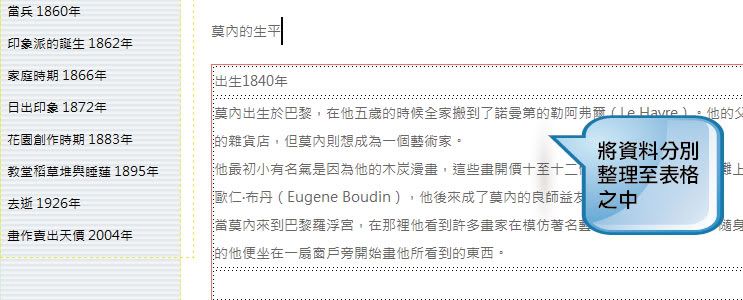
  65. 11.18 #L-list?的字型設定
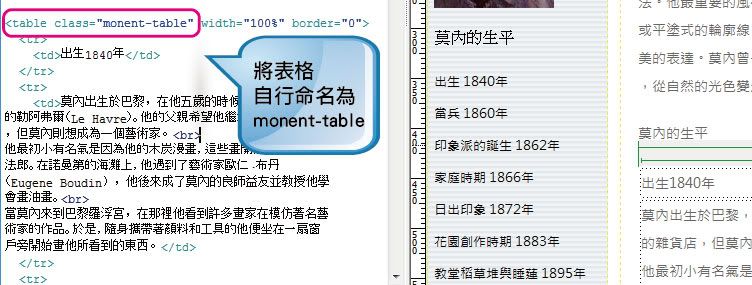
  66. 11.19 將#L-list,清單樣式設為none(無樣式)
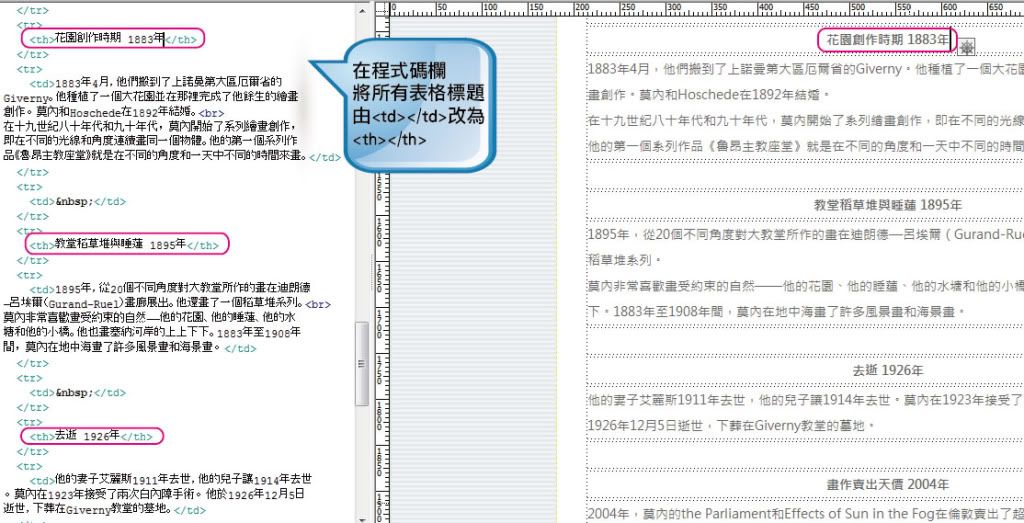
  67. 11.20 將#L-list,Margin、Padding 皆設為0,清除清單預設距離
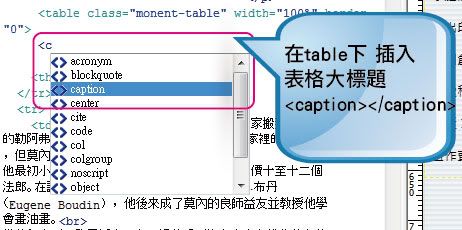
  68. 11.21 雙欄式網頁及左側的L-list,清單樣式大致設定完成
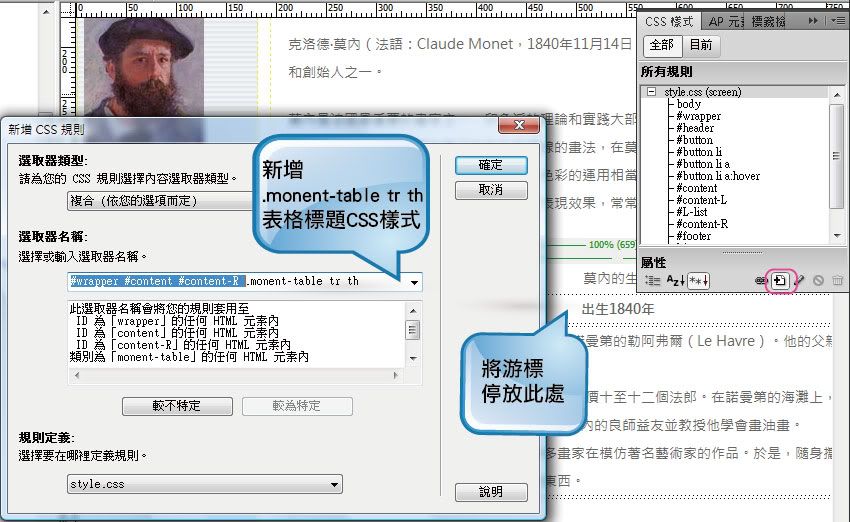
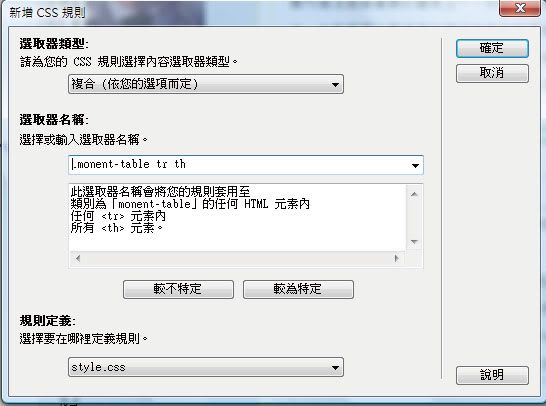
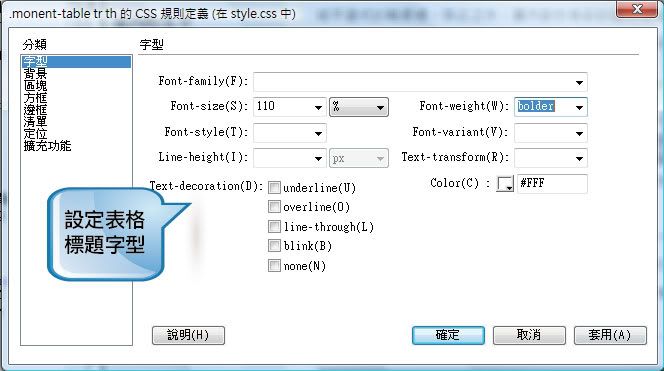
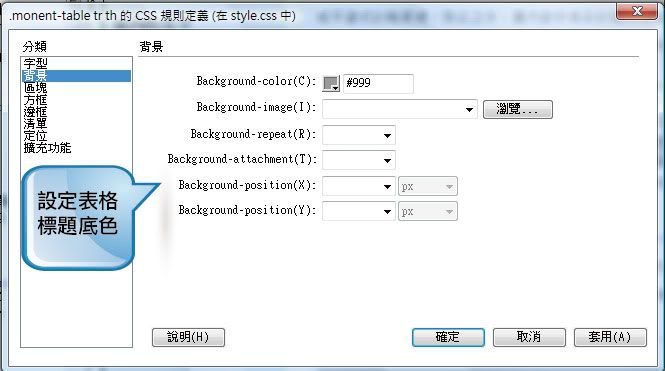
  69. 12. 表格設定的步驟
  70. 12.1 於#content-R插入表格
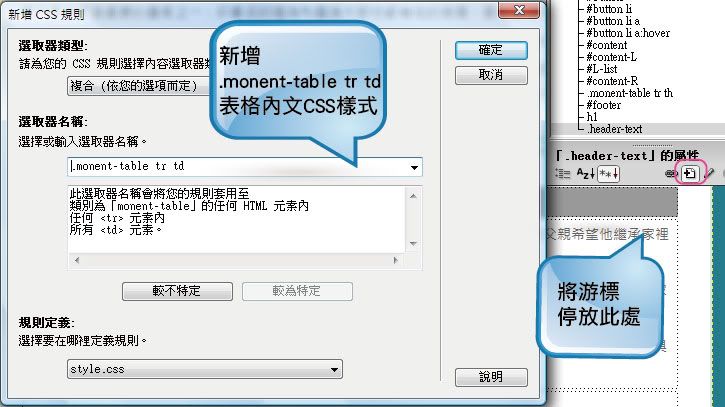
  71. 12.2 插入27列1欄,無框線、100%的表格(隨著DIV寬度調整表格寬度),若設為100% ,IE6會有表格往下的問題
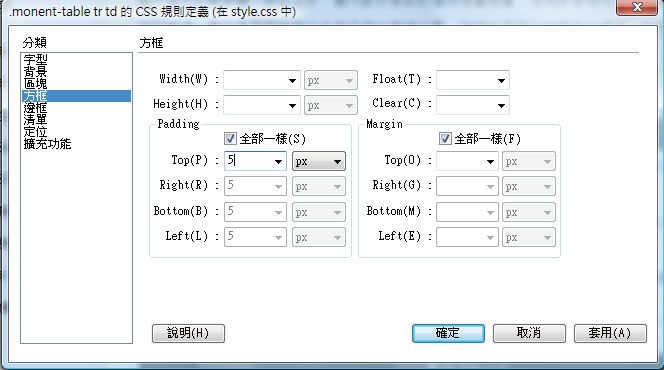
  72. 12.3 將資料分別整理至表格之中
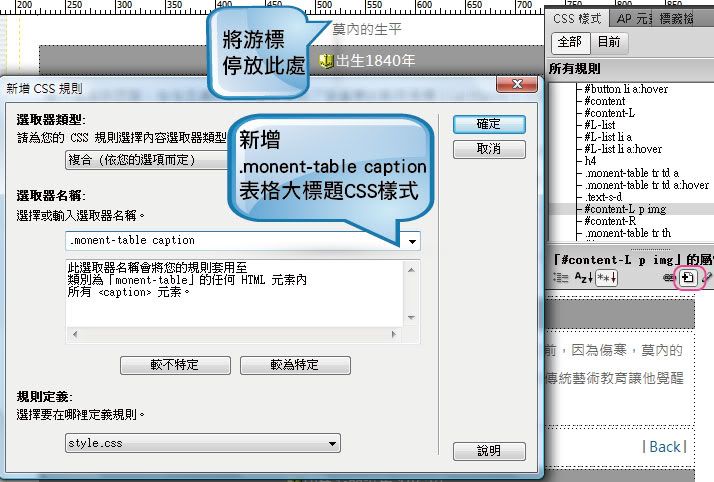
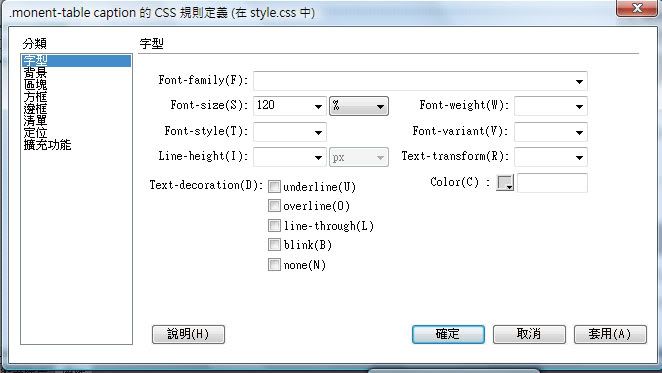
  73. 12.4 將表格自行命名為monent-table
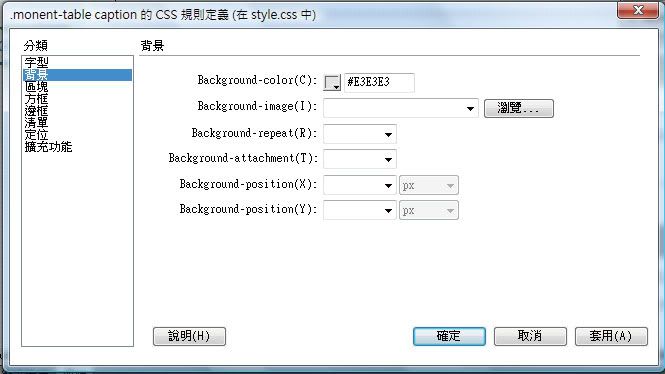
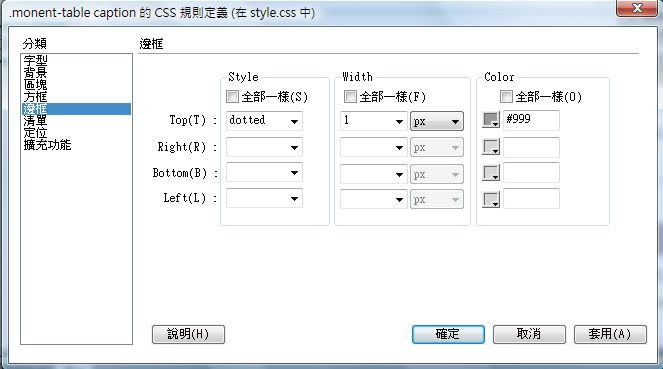
  74. 12.5 在程式碼欄,將所有表格標題,由<td></td>改為<th></th>
  75. 12.6 在table下 插入表格大標題<caption></caption>
  76. 12.7 新增.monent-table tr th 標題CSS樣式
  77. 12.8 設定表格標題字型、設定表格標題底色
  78. 12.9 新增.monent-table tr td 表格內文CSS樣式
  79. 12.10 .monent-table tr td 表格內文,Padding內距與邊框底線的設定
  80. 12.11 新增.monent-table caption 表格大標題CSS樣式
  81. 12.12 .monent-table tr td 表格內文,底色與邊框底線的設定
  82. 13. 錨點連結設定的步驟
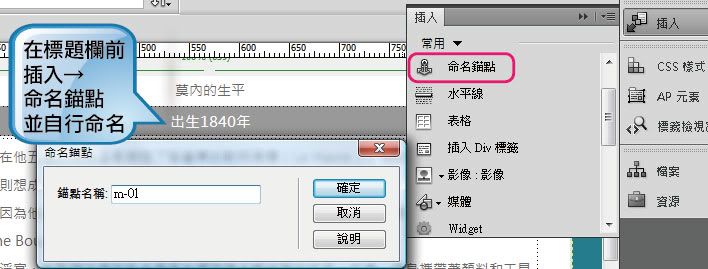
  83. 13.1 在標題欄前,插入→命名錨點,並自行命名
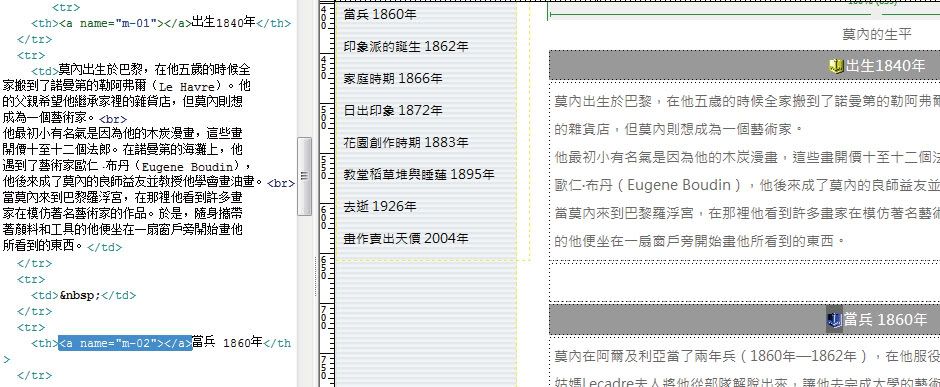
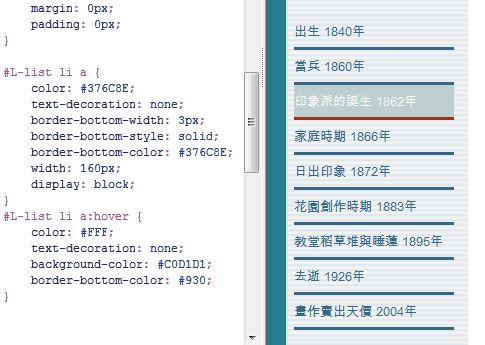
  84. 13.2 於每個標題前,分別命名錨點
  85. 13.3 在header標題欄,插入→命名錨點,並自行命名為top
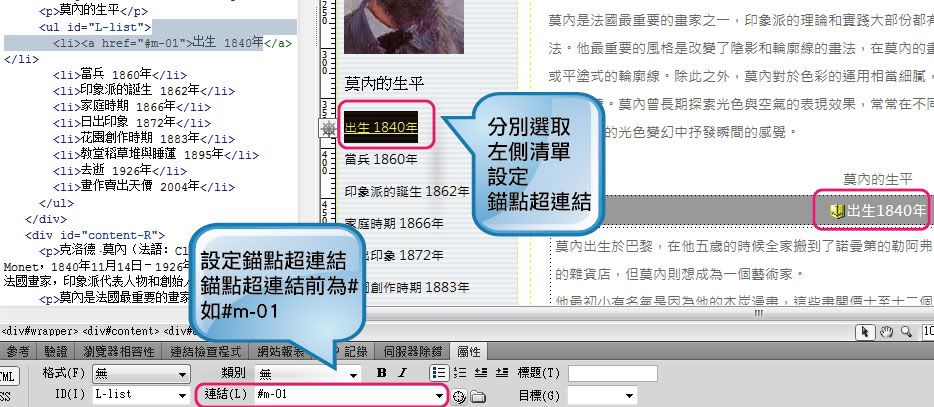
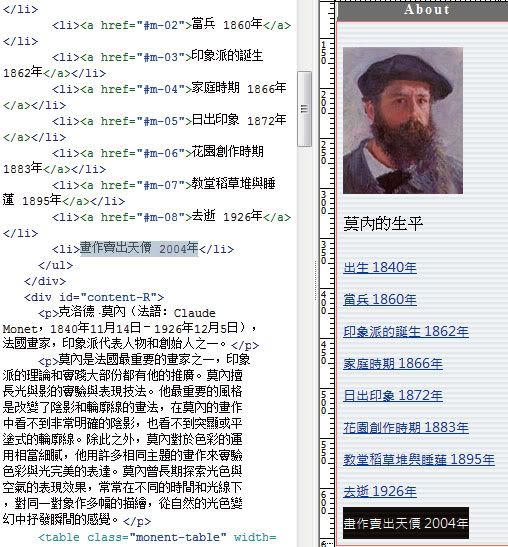
  86. 13.4 分別選取左側清單,設定錨點超連結,錨點超連結前為#,如#m-01
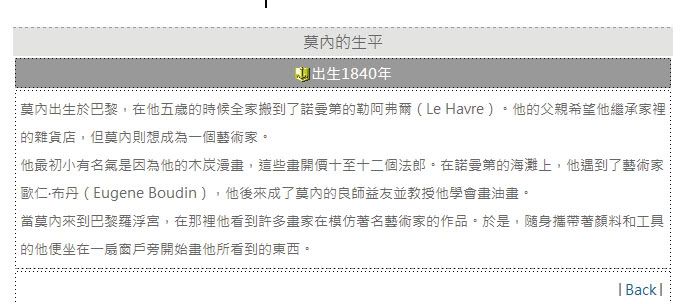
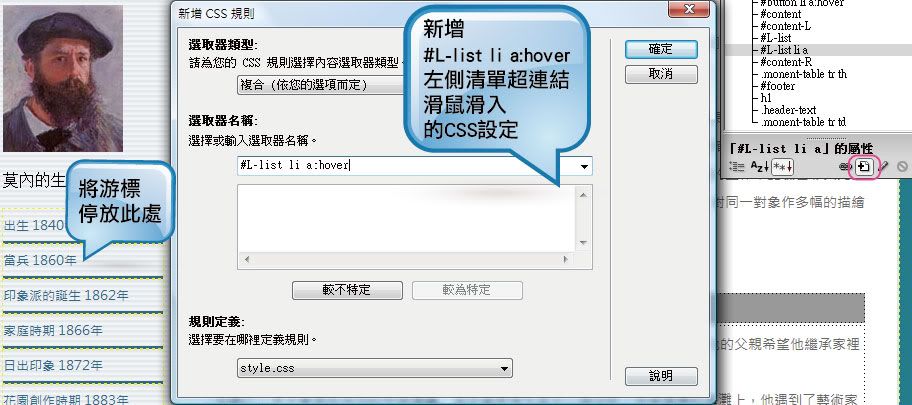
  87. 13.5 分別設定完成
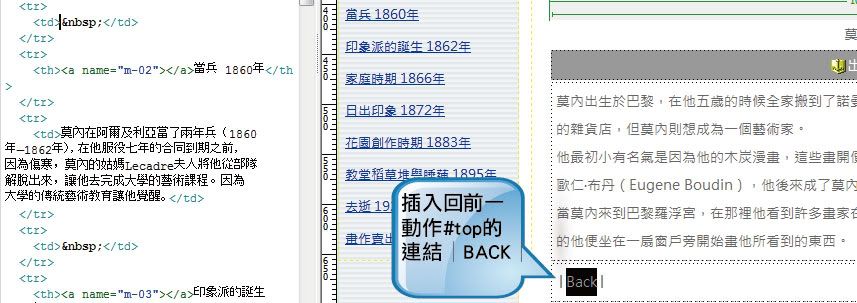
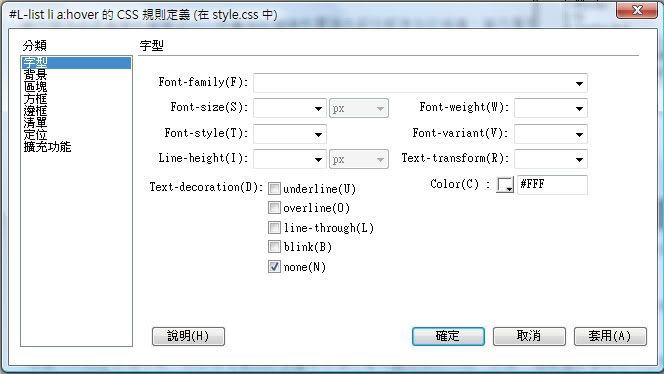
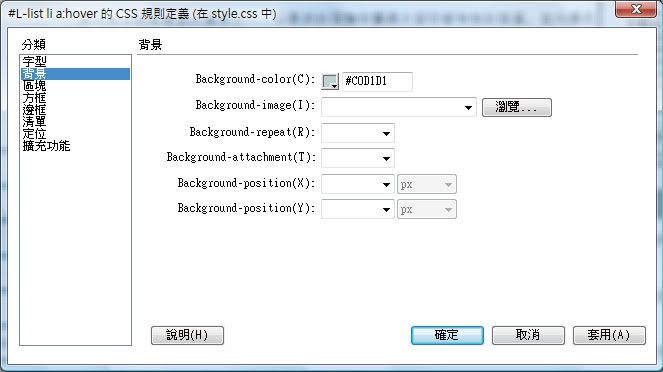
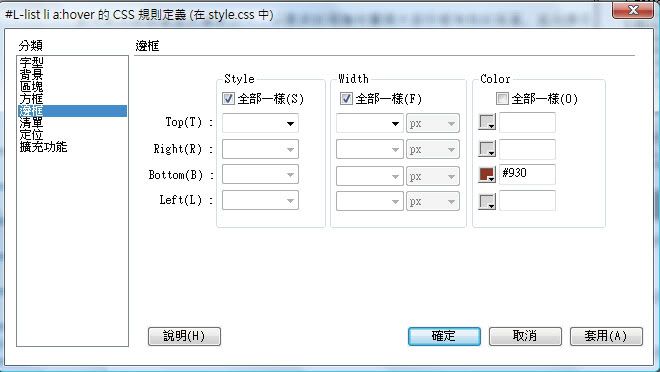
  88. 13.6 插入回前一動作#top 的連結│BACK│
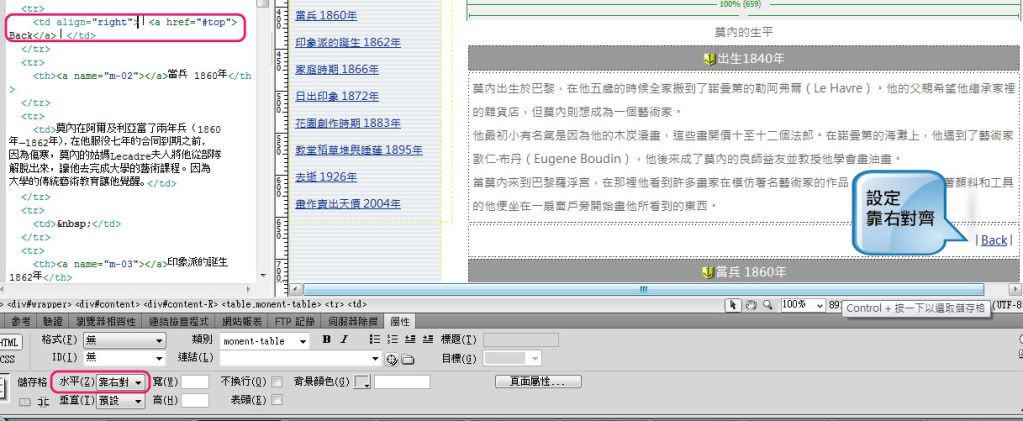
  89. 13.7 │BACK│設置靠右對齊
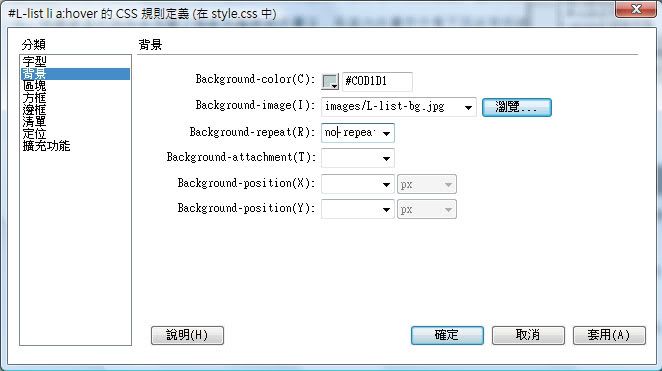
  90. 14. 左側清單列按鈕設定的步驟
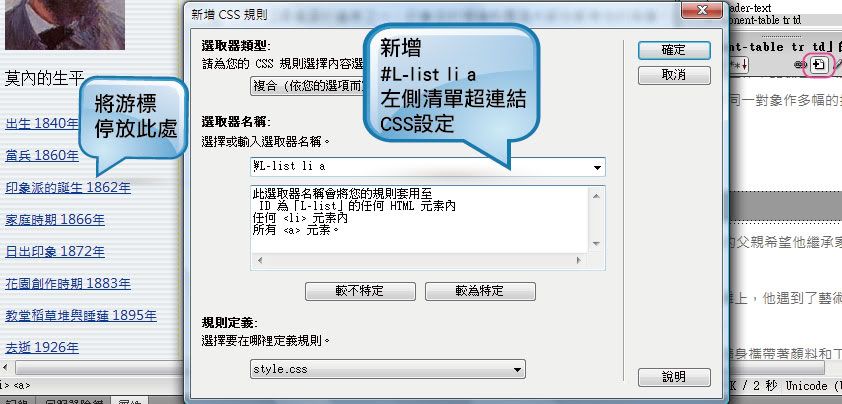
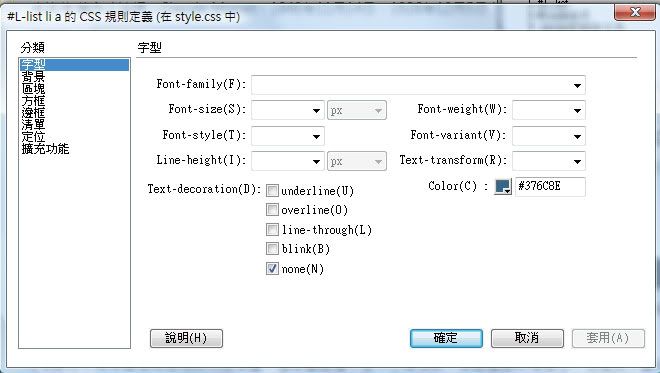
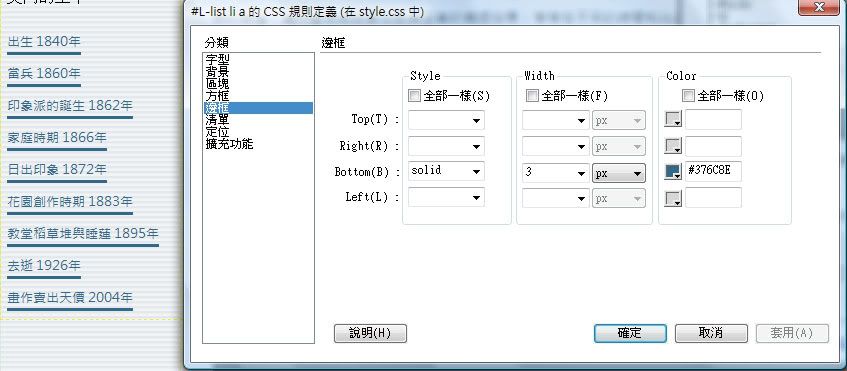
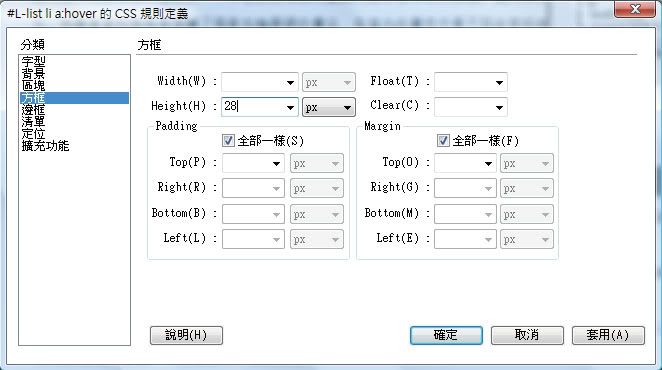
  91. 14.1 新增 #L-list li a 左側清單超連結CSS設定
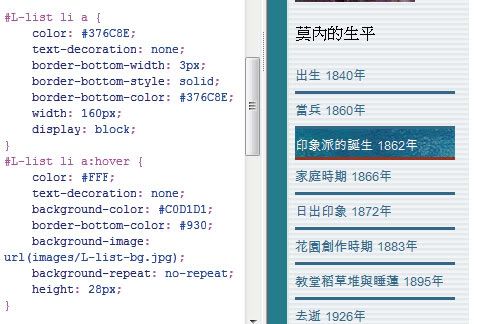
  92. 14.2 設定#L-list li a ,字型及底部邊框的設定
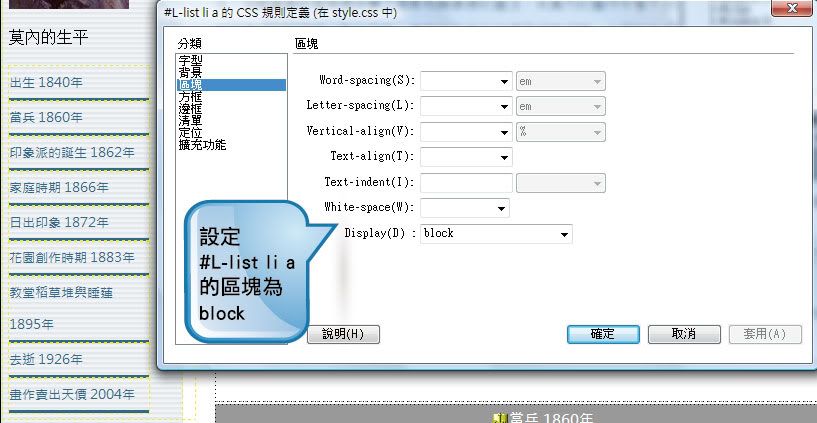
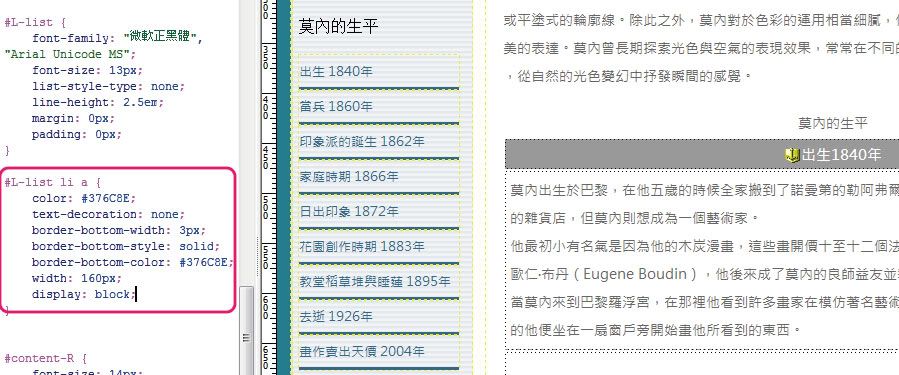
  93. 14.3 設定#L-list li a ,的區塊為block
  94. 14.4 新增 #L-list li a:hover 左側清單超連結,滑鼠滑入的CSS設定
  95. 14.5 設定#L-list li a:hover ,字型、底色、底部邊框的設定
  96. 14.6 設定後,滑鼠移過的效果
  97. 14.7 設定#L-list li a:hover ,加入底圖的設定
  98. 14.8 設定#L-list li a:hover 高度
  99. 14.9 設定後,滑鼠移過的底圖效果

8. 雙欄網頁概述


本單元範例網頁:http://mepopedia.com/~jinjin/web/hw07/

多欄式的網頁配置,可以透過float:浮動屬性或position:定位屬性來處理。這兩種方法對版塊造成的影響也相當大。

float:浮動屬性,使區塊浮動的做法,優點是可以依照內容改變區塊的高度,缺點是較容易引起「欄位崩壞」等重大版面顯示的問題。

position:定位屬性,執行絕對配置的做法,雖沒有往下方調整的彈性,但因未完全固定在特地位置上,則容易維持版面的外觀。


9. 雙欄網頁,float:浮動屬性做法概述


本單元則要以要float:浮動屬性的做法,來講解製作多欄(雙欄)網頁的方法。

以float:浮動屬性製作多欄網頁的做法有很多種,分別敘述如下:

1. 左側欄位:固定寬度,靠左浮動;右側欄位:設定左邊的margin(左邊間距),不設定浮動


2. 左側欄位:固定寬度,靠左浮動;右側欄位:設定靠左浮動,寬度可以設定也可以不設定,但寬度不可大於總寬度減左側欄位的寬度,建議更小一點,以免造成欄位崩壞的問題


3. 左側欄位:固定寬度,靠左浮動;右側欄位:設定靠右浮動,寬度可以設定也可以不設定,但寬度不可大於總寬度減左側欄位的寬度,建議更小一點,以免造成欄位崩壞的問題


10. 本單元雙欄網頁範例,float:浮動屬性做法概述


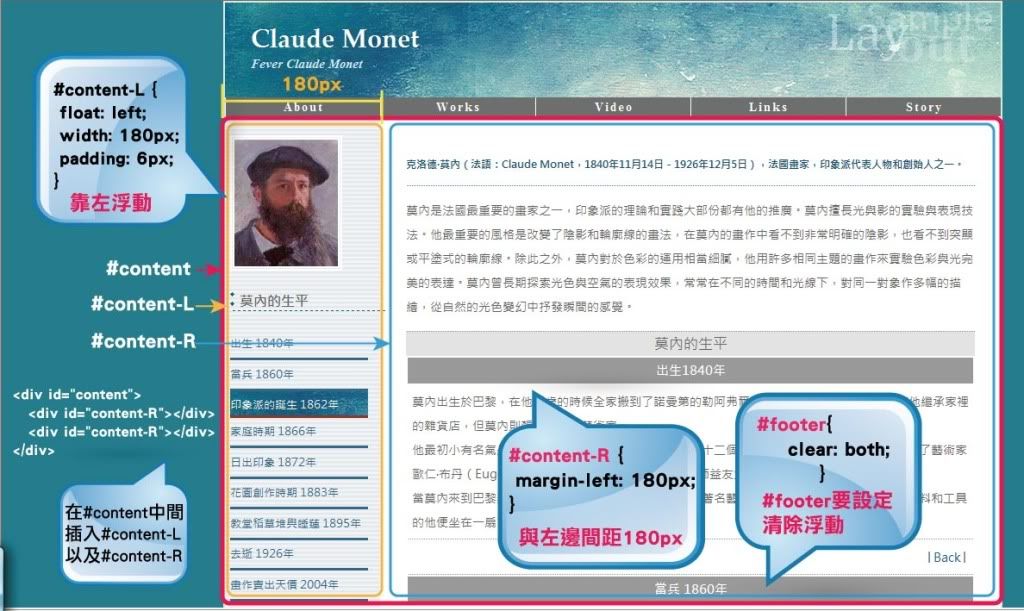
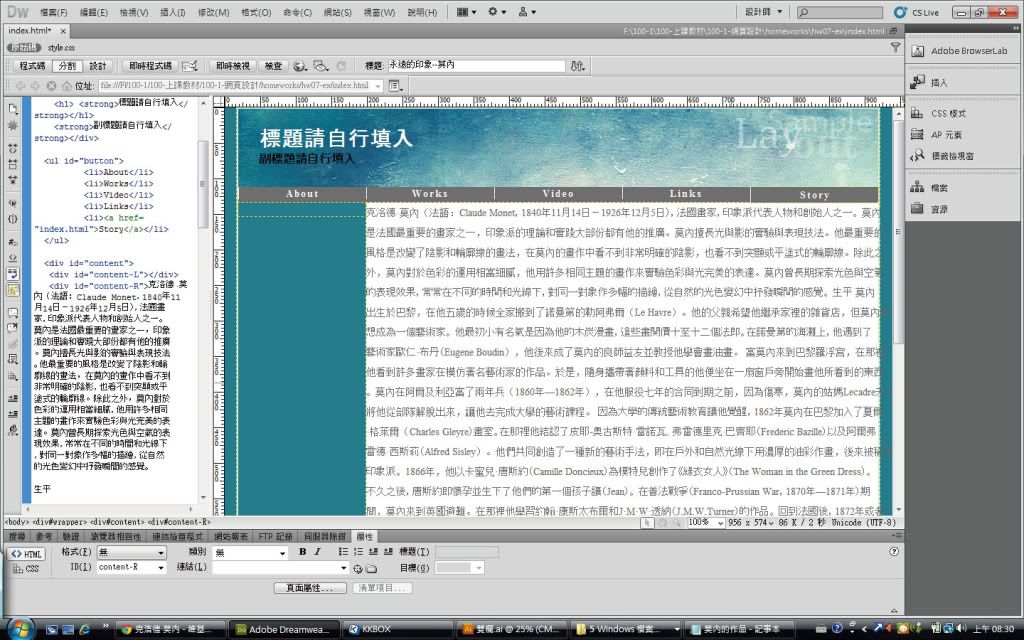
本範例是以先前的範例#content內,加入兩個DIV:#content-L:靠左邊,#content-R:則在右邊,如圖所示:


HTML的架構語法如下:

<div id="wrapper"> <div id="header"></div> <ul id="button"></ul> <div id="content"> <div id="content-L"></div> <div id="content-R"></div> </div> </div>

CSS的設定如下:

#content-L{ width: 180px; /*#content-L的寬度*/ float: left; /*#content-L設定靠左邊浮動*/ } #content-R{ background-color: #FFF; /*設定底色為白色*/ margin-left: 180px; /*間距設定為180px,(#content-L的寬度)*/ } #content{ background-image: url(images/left-bg.gif); /*設定背景圖片,會顯示在#content-L*/ } #footer{ clear:both; /*清除浮動設定*/ }


11. 雙欄網頁,float:浮動屬性做法步驟


以下則為製作雙欄浮動的圖解步驟:

1. 在#content內,加入兩個DIV:#content-L:靠左邊,#content-R:則在右邊


http://i556.photobucket.com/albums/ss1/whc915/hw07-001.jpg

2. 在CSS新增插入#content-L?以及#content-R (可手動加入,也可以Dreamweaver指令插入


http://i556.photobucket.com/albums/ss1/whc915/hw07-03.jpg

3. 新增ID CSS,命名為content-L


http://i556.photobucket.com/albums/ss1/whc915/hw07-04.jpg

4. Float浮動設定Left,靠左對齊;寬度設為?180px


http://i556.photobucket.com/albums/ss1/whc915/hw07-05.jpg

http://i556.photobucket.com/albums/ss1/whc915/hw07-06.jpg


5. 設定#content-L,Padding:6px


http://i556.photobucket.com/albums/ss1/whc915/hw07-24.jpg


6. 新增ID CSS,命名為content-R


http://i556.photobucket.com/albums/ss1/whc915/hw07-07.jpg


7. Margin:間距,設定180px (#content-L的寬度)


http://i556.photobucket.com/albums/ss1/whc915/hw07-08.jpg


8. #content-R?的字型設定


http://i556.photobucket.com/albums/ss1/whc915/hw07-09.jpg


9. #content-R?背景設為白色


http://i556.photobucket.com/albums/ss1/whc915/hw07-10.jpg


10. #content-R?,Padding內距?上右下設定為30px,使視覺效果更舒服


http://i556.photobucket.com/albums/ss1/whc915/hw07-11.jpg

http://i556.photobucket.com/albums/ss1/whc915/hw07-12.jpg

http://i556.photobucket.com/albums/ss1/whc915/hw07-13.jpg

http://i556.photobucket.com/albums/ss1/whc915/hw07-10.jpg


11. #content?設定底圖,會顯現在#content-L,(因#content-R設為白色右邊蓋住底圖)


http://i556.photobucket.com/albums/ss1/whc915/hw07-15.jpg

http://i556.photobucket.com/albums/ss1/whc915/hw07-16.jpg


12. 於#content-L?插入影像


http://i556.photobucket.com/albums/ss1/whc915/hw07-17.jpg


13. 於#content-L,貼上記事本的清單列文字,做為左列的清單按鈕文字


http://i556.photobucket.com/albums/ss1/whc915/hw07-18.jpg

14. 選取,設成清單項目


http://i556.photobucket.com/albums/ss1/whc915/hw07-19.jpg

15. Back回上行?Enter段落?成為清單li


http://i556.photobucket.com/albums/ss1/whc915/hw07-20.jpg


16. 將ul的id命名為L-list (可自行命名)新增ID CSS命名為L-list


http://i556.photobucket.com/albums/ss1/whc915/hw07-21.jpg


17. 新增ID CSS命名為L-list


http://i556.photobucket.com/albums/ss1/whc915/hw07-22.jpg


18. #L-list?的字型設定


http://i556.photobucket.com/albums/ss1/whc915/hw07-23.jpg


19. 將#L-list,清單樣式設為none(無樣式)


http://i556.photobucket.com/albums/ss1/whc915/hw07-27.jpg


20. 將#L-list,Margin、Padding 皆設為0,清除清單預設距離


http://i556.photobucket.com/albums/ss1/whc915/hw07-25.jpg

http://i556.photobucket.com/albums/ss1/whc915/hw07-26.jpg


21. 雙欄式網頁及左側的L-list,清單樣式大致設定完成


12. 表格設定的步驟


1. 於#content-R插入表格


http://i556.photobucket.com/albums/ss1/whc915/hw07-28.jpg


2. 插入27列1欄,無框線、100%的表格(隨著DIV寬度調整表格寬度),若設為100% ,IE6會有表格往下的問題


此處改為固定寬度(約小於 650px,視整體寬度而定)

http://i556.photobucket.com/albums/ss1/whc915/hw07-29.jpg


3. 將資料分別整理至表格之中


http://i556.photobucket.com/albums/ss1/whc915/hw07-30.jpg


4. 將表格自行命名為monent-table


http://i556.photobucket.com/albums/ss1/whc915/hw07-31.jpg


5. 在程式碼欄,將所有表格標題,由<td></td>改為<th></th>


http://i556.photobucket.com/albums/ss1/whc915/hw07-32.jpg

6. 在table下 插入表格大標題<caption></caption>


http://i556.photobucket.com/albums/ss1/whc915/hw07-33.jpg

http://i556.photobucket.com/albums/ss1/whc915/hw07-34.jpg


7. 新增.monent-table tr th 標題CSS樣式


http://i556.photobucket.com/albums/ss1/whc915/hw07-35.jpg

http://i556.photobucket.com/albums/ss1/whc915/hw07-36.jpg


8. 設定表格標題字型、設定表格標題底色


http://i556.photobucket.com/albums/ss1/whc915/hw07-37.jpg

http://i556.photobucket.com/albums/ss1/whc915/hw07-38.jpg

http://i556.photobucket.com/albums/ss1/whc915/hw07-39.jpg


9. 新增.monent-table tr td 表格內文CSS樣式


http://i556.photobucket.com/albums/ss1/whc915/hw07-40.jpg


10. .monent-table tr td 表格內文,Padding內距與邊框底線的設定


http://i556.photobucket.com/albums/ss1/whc915/hw07-41.jpg

http://i556.photobucket.com/albums/ss1/whc915/hw07-42.jpg

http://i556.photobucket.com/albums/ss1/whc915/hw07-43.jpg


11. 新增.monent-table caption 表格大標題CSS樣式


http://i556.photobucket.com/albums/ss1/whc915/hw07-44.jpg


12. .monent-table tr td 表格內文,底色與邊框底線的設定


http://i556.photobucket.com/albums/ss1/whc915/hw07-45.jpg

http://i556.photobucket.com/albums/ss1/whc915/hw07-46.jpg

http://i556.photobucket.com/albums/ss1/whc915/hw07-47.jpg

http://i556.photobucket.com/albums/ss1/whc915/hw07-48.jpg


13. 錨點連結設定的步驟


1. 在標題欄前,插入→命名錨點,並自行命名


http://i556.photobucket.com/albums/ss1/whc915/hw07-49.jpg

http://i556.photobucket.com/albums/ss1/whc915/hw07-50.jpg


2. 於每個標題前,分別命名錨點


http://i556.photobucket.com/albums/ss1/whc915/hw07-51.jpg


3. 在header標題欄,插入→命名錨點,並自行命名為top


http://i556.photobucket.com/albums/ss1/whc915/hw07-52.jpg


4. 分別選取左側清單,設定錨點超連結,錨點超連結前為#,如#m-01


http://i556.photobucket.com/albums/ss1/whc915/hw07-53.jpg


5. 分別設定完成


http://i556.photobucket.com/albums/ss1/whc915/hw07-54.jpg


6. 插入回前一動作#top 的連結│BACK│


http://i556.photobucket.com/albums/ss1/whc915/hw07-55.jpg


7. │BACK│設置靠右對齊


http://i556.photobucket.com/albums/ss1/whc915/hw07-56.jpg


14. 左側清單列按鈕設定的步驟


1. 新增 #L-list li a 左側清單超連結CSS設定


http://i556.photobucket.com/albums/ss1/whc915/hw07-57.jpg

2. 設定#L-list li a ,字型及底部邊框的設定


http://i556.photobucket.com/albums/ss1/whc915/hw07-58.jpg

http://i556.photobucket.com/albums/ss1/whc915/hw07-59.jpg


3. 設定#L-list li a ,的區塊為block


http://i556.photobucket.com/albums/ss1/whc915/hw07-60.jpg

http://i556.photobucket.com/albums/ss1/whc915/hw07-61.jpg


4. 新增 #L-list li a:hover 左側清單超連結,滑鼠滑入的CSS設定


http://i556.photobucket.com/albums/ss1/whc915/hw07-62.jpg


5. 設定#L-list li a:hover ,字型、底色、底部邊框的設定


http://i556.photobucket.com/albums/ss1/whc915/hw07-63.jpg

http://i556.photobucket.com/albums/ss1/whc915/hw07-64.jpg

http://i556.photobucket.com/albums/ss1/whc915/hw07-65.jpg

6. 設定後,滑鼠移過的效果


http://i556.photobucket.com/albums/ss1/whc915/hw07-66.jpg


7. 設定#L-list li a:hover ,加入底圖的設定


http://i556.photobucket.com/albums/ss1/whc915/hw07-67.jpg


8. 設定#L-list li a:hover 高度


http://i556.photobucket.com/albums/ss1/whc915/hw07-68.jpg


9. 設定後,滑鼠移過的底圖效果


http://i556.photobucket.com/albums/ss1/whc915/hw07-69.jpg

Viewing all articles
Browse latest Browse all 70

Trending Articles